No, I didn't change the address of my new blog. It's still here. I just thought I'd make another post, just in case the followers on blog spot didn't realize it. ;) I've noticed that a bunch of my click-ins on wordpress come from here, actually, which is pretty interesting.
Mercia Dragonslayer
Saturday, October 29, 2011
Monday, October 10, 2011
Wordpress again...
Okay, so I'm moving completely to Wordpress. Here's the link to my new blog. I probably won't be posting anything on here anymore, because it's too difficult for me to keep up with TWO blogs that are basically the same thing. XD
Mercia Dragonslayer
Mercia Dragonslayer
Thursday, September 22, 2011
WORDPRESS!
Hello, all!
So! I've moved to wordsbreathedupon.wordpress.com. The reason I moved is because wordpress will let me create a whole website, instead of just a blog with a few extra pages. Don't worry, I'll still keep posting here! I just wanted to mention that.
~Mercia Dragonslayer
So! I've moved to wordsbreathedupon.wordpress.com. The reason I moved is because wordpress will let me create a whole website, instead of just a blog with a few extra pages. Don't worry, I'll still keep posting here! I just wanted to mention that.
~Mercia Dragonslayer
Murderous Author
(I feel compelled to warn you of the content within–there are significant spoilers for Harry Potter and the Deathly Hallows by J.K.Rowling, Forest of Lies by Rachel Garner, andLove and Forgiven by me. I have a feeling most people know what happens in the latter two, anyway.)
Death is great!
Oh, yes. Death in all its marvelous, emotional, wonderful glory is definitely great. Now, before the police intervene, let me explain—I don’t mass murder people. Instead, I examine the emotional impact of deaths in stories, especially in fantasy, and turn them into general applications. The goal of every story, after all, is to create emotion.
The death of Severus Snape creates significant emotion. Throughout each of the Harry Potter novels, Severus continues to harass and demean Harry. He snarls, snaps, and sneers at anything and everyone—and I hated him for it. Yet, when he, of all people, became a victim of Voldemort’s insane quest for power, I felt a sense of helplessness and despair. If Snape, a much stronger character than Harry, couldn’t defeat the villain, how could Harry possibly do it?
The ending of Severus Snape demonstrates an important principle that I apply to my own stories. The death of any major character should build tension. When a major character dies, the hero realizes just how much he stands to lose. The reader sits on the edge of his chair, eyes glued to the page. Will the hero make it? Will he win against the dastardly villain? These questions spur the reader on through the story.
Forest of Lies (by Rachel Garner) sent my emotions on a roller coaster ride. I spent the several chapters leading up to this black moment worrying over the mentor, Robin, who nearly kills himself in an accident. The moment Much gasped his last words and slumped over, I stared at the page in shock. Surely not Much—not lovable, hilarious, defenestrating Much-of-Nottingham! I recovered quickly enough to shoot the author an email. “How could you?” I cried, tears streaming down my cheeks. “He was my favoritecharacter!”
From this story I learned the principle of misdirection. If a writer can mislead the reader to agonize over a specific character, the death of another will shock him. Very simple, yet effective. Shock from the death of a favorite character gets to a reader in a way that angst and despair can’t.
I think a character by the name of Kahil Ranz hurt me the most to kill. I loved him. I knew his life plans for after the story. I desperately wanted him to live. I even wrote a scene placed after Kahil “died,” where I intended to show a missing body to imply that Kahil somehow got away. (My best friend promptly disabused me of that notion by deleting the scene and inserting Kahil’s funeral instead.) So too, other readers beat at the virtual doors of my email, wondering whether I really exterminated the character they loved the most.
I saw that if I love the character, the audience may very well love him, too. Kahil ended up as the most developed of all because I made him my favorite character. I spent hours and hours setting up Kahil’s back-story. I honed his wit and dialogue, his clothing and weapons. I knew every single thing about this character, and it hurt me to kill him. The readers saw this; my emotion passed on to them.
I also applied this principle in the novel I wrote in 2009. My favorite character of that story came to a place where he either gave himself up or let his son die. Of course, the theme of my story dictated that he should sacrifice himself for the hero, but I loved him too much!
“I don’t want to kill him!” I wailed to my mother.
My mother, the ever-sensible one, said, “Does it make the story better?”
“Well, it would, but I really don’t want to kill him!”
She hummed and spared a glance at my favorite school curriculum on the shelf. “Well,” she said, in tones even my writing teacher Mr. S couldn’t emulate, “If you don’t want to do it, doesn’t that mean you should?”
Amidst tears of sorrow, Caradoc died.
The principles of story-telling stay basically the same for each element in the story—good dialogue, interesting prose, intriguing plot, and meaningful details. But, I believe that a good character death will make the story stand out. Plots are a dime-a-dozen. Anyone can write about a Chosen Hero off to save the world in light of a prophecy. Few writers, however, can turn a character death into something emotional using tension-building, misdirection, and author adoration, or even all three.
~Mercia Dragonslayer
(I desperately wanted to put this somewhere, seeing as I labored for weeks over it. I’ll probably post a drawing this afternoon–maybe even something relevant to this!)
Monday, September 19, 2011
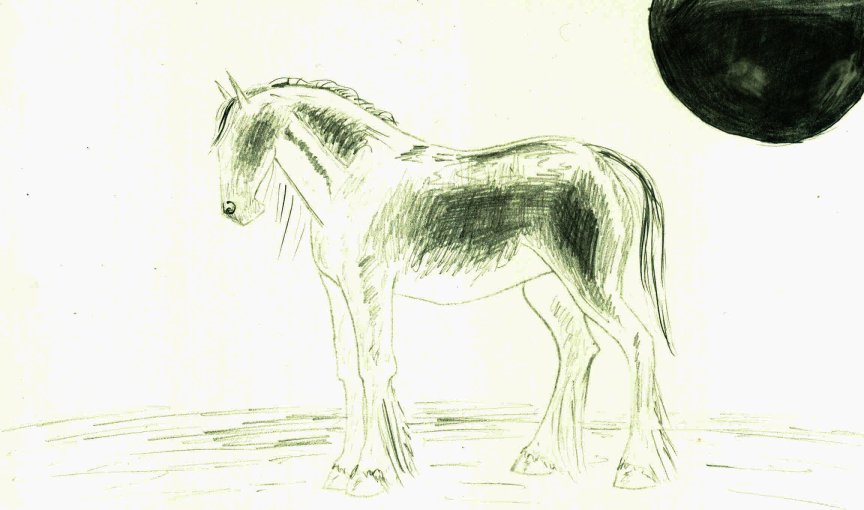
SS 3: Inverted Drawing
All right, so I haven't been exactly diligent in updating my blog. I sincerely apologize for that... I suppose I need to make myself a schedule, don't I?
So for today's drawing, I decided to try an inverted picture. I drew my horse and shaded it opposite--so all the light areas were shaded dark, and vice versa.

Then I scanned the picture, opened it in Paintshop Pro, and inverted the coloring.

Very interesting, no? If I were to use it for anything I'd touch it up a bit, but it looks interesting the way it is. I also realize the shading isn't fantastic--but why don't YOU try shading backwards? It's more difficult than the right way.
So for today's drawing, I decided to try an inverted picture. I drew my horse and shaded it opposite--so all the light areas were shaded dark, and vice versa.
Then I scanned the picture, opened it in Paintshop Pro, and inverted the coloring.

Very interesting, no? If I were to use it for anything I'd touch it up a bit, but it looks interesting the way it is. I also realize the shading isn't fantastic--but why don't YOU try shading backwards? It's more difficult than the right way.
Friday, September 2, 2011
SS 2: Jumping Horse
Welcome to the second day of September Sketches! This is, again, another tutorial that isn't really a tutorial of a jumping horse. This is another pose I've practiced so much that I can practically draw it in my sleep! ...Okay, not really... Mm, and I adjusted the gamma correction again on this one to darken the lines. Really, my scanner does a terrible job of, well, scanning.

Here's the text on the picture, starting with the text under "September 2, 2011," and continuing clockwise.
1. Today, I drew a jumping horse. The pose, I've found, is fairly simple to draw and adjust to the diff. jumping phases. In this drawing, you can see the position of the guide circles as opposed to the basic kidney bean.
2. Notice the circles are slightly squished, because the body is elongated.
3. Mercia Dragonslayer (My drawing again, folks! Couldn't have guessed it!)
4. I ignore the hoof/shoulder/leg correlation here--I just draw an angle that looks right.
5. I adjusted the head and nose, distinguishing them and making them more realistic rather than "cartoonish." (This sounds funny. I didn't adjust the head and nose as I drew them--I adjusted them from yesterday's picture. Yesterday's didn't have the same amount of detail and was basically two circles with two lines. I added the dips and curves you would see on a real horse's face.)
6. The mane is still light, but now flowing. Don't make it too dark!
7. Same for the tail.
I didn't add in the note at the bottom in order, because it pertains to the picture as a whole.
8. Remember, the horse is moving in this picture. You must keep him relaxed and free-flowing. (I.E., don't make him all straight lines and cubes. Let your wrist flow from one shape to the next. Use plenty of curves.)
Please comment and tell me if any of those directions were unclear or confusing, and I'll do my best to be better in the future.
Yesterday, I told you to practice, practice, practice, and you'll eventually get better. This statement is completely true, but there is also another element--observing. Go out to a farm and watch a horse. See how he moves, how he stands, how he acts. Observe the way his legs bend and how his hooves are angled. This will help you better draw him later on.
~Mercia Dragonslayer
Thursday, September 1, 2011
SS 1: Basic Pony
Today marks the beginning of September Sketches, where I will post a different drawing or drawing tutorial every day in September. Today, I decided to make a tutorial, of sorts, for a pony. Note--I darkened the lines in Paintshop, because the scanner butchered them. You can also click on the picture to see it full-size. I tried to have it that way in the post, but it messed up my formatting.

Hopefully you can see the writing, but if not, I'm including it here below--starting with the paragraph under "September 1, 2011" and continuing clockwise around the picture.
1. Basic horse/pony. More pony, really. If you look closely, you can see the guide circles I used. If you build off the circles correctly, you can use the remnants to shade your horse. (Above: Kidney bean shape for body)
2. Mercia Dragonslayer (My signature. While I'm on it, please remember that this is my artwork and I'd like you to respect that by not copying it!)
3. See, the line of the shoulder is parallel to the front line of the hoof. So the leg should be angled like this: (see picture for diagram)
4. Nose circle should be larger than the knee.
5. The mane should be light and whispy, but with enough solidity to distinguish it from your shading.
6. Highlight approx. in the middle. The neck rises there, the mane should be shaded and drawn accordingly. (You'll have to look at the drawing to see what I mean.)
This concludes my first ever drawing tutorial, of sorts! I hope you enjoyed it and/or learned from it. Remember, practice makes perfect--if you practice the same form over and over again, you'll perfect it. Keep holding on!
~Mercia Dragonslayer
Subscribe to:
Posts (Atom)